Southern Spice Homestyle Delights
7 Easy No Bake Christmas Candy Recipes (Cool Whip Candy & More Holiday Treats)
Discover 7 easy No Bake Christmas Candy Recipes with Cool Whip candy, chocolate bark, and festive fudge, perfect for quick party trays and gifts.
RECIPES & COOKING
Shari Smith
11/25/202512 min read
This post may contain affiliate links, and I may earn a commission if you choose to make a purchase through them.


Looking for No Bake Christmas Candy Recipes that don’t take all day, don’t heat up your kitchen, and still taste like something from a fancy candy shop? These simple treats use short ingredient lists, the microwave, and a bit of stirring. That is it.
This collection walks through seven tried-and-true candies, all family-tested and holiday-approved. You will find creamy Cool Whip “Three Musketeers” style candy, two ingredient fudge with tons of flavor options, old-fashioned Cherry Mash, and more.
Grab a mixing bowl, clear a little space in the freezer, and let’s make Christmas candy the easy way.

7 Easy No Bake Christmas Candy Recipes - Cool Whip Candy And More Holiday Treats!
Watch Video...
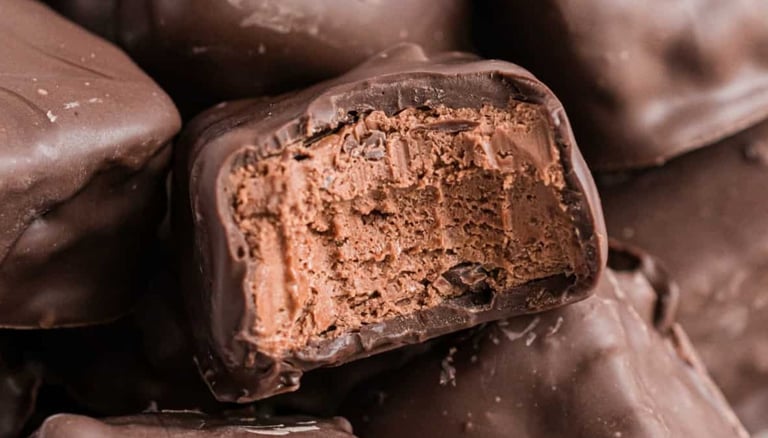
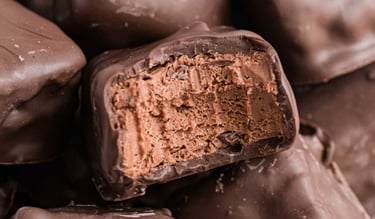
1. Cool Whip Candy (Three Musketeers Style)
This Cool Whip candy is often called homemade Three Musketeers. The center is fluffy and light, and the chocolate coating is richer than the store-bought bar. It is one of those recipes that looks fancy but comes together with only three main ingredients.
Ingredients
2 packages milk chocolate chips, 11 oz each
1 container Cool Whip, 8 oz, thawed
24 oz chocolate melting wafers for dipping
Parchment paper or a well-greased pan
Tip: Save those Cool Whip containers for Thanksgiving and Christmas leftovers. They stack nicely in the fridge and freezer.
If you want the full printable recipe with measurements, you can find it with the other candies on the 25 Best Easy Christmas Candies page.
How to Melt the Chocolate Without Burning It
Milk chocolate can burn fast in the microwave, especially on the bottom of the bowl. A little patience here keeps your candy smooth.
Place the chocolate chips in a microwave safe bowl.
Microwave for 45 seconds to 1 minute the first time.
Stir well, reaching all the way to the bottom.
Continue microwaving in 30 second intervals, stirring after each one.
It usually takes about 2 to 2½ minutes total for the chips to melt. If most of the chips are melted and only a few small pieces remain, stop microwaving. Let the bowl sit a minute, then stir again. The residual heat will finish the job.
Now you want the chocolate to cool down to about 80°F, close to room temperature. This keeps the Cool Whip from melting when you mix them.
Check with a digital or laser thermometer if you have one. A handy option like the digital thermometer they use in the video makes this simple.
If you do not have a thermometer, let the chocolate sit and cool, stirring every 5 minutes or so. When it is thick but still stirrable and feels about room temperature, it is ready.
Mixing with Cool Whip and Spreading in the Pan
Line an 8x8 or similar baking dish with parchment paper, or grease it very well. Parchment sheets like these pre-cut parchment sheets make cleanup a lot easier.
Put the thawed Cool Whip in a mixing bowl.
Pour the cooled melted chocolate on top.
Gently fold the chocolate into the Cool Whip.
The mixture will start out soft, then get thicker as the chocolate cools more. Do not panic if it stiffens. Just keep folding and scraping the sides and bottom of the bowl so everything blends together. A spatula helps you get every bit of chocolate.
Family tip: Do not scrape the bowl completely clean. Leave a little behind so kids (and grown-ups) can lick the bowl. It is half the fun of holiday baking.
Once the mixture is fully combined:
Pour it into the prepared pan.
Spread it out as evenly as you can with a spatula.
If it is too sticky, lightly spray your hands with cooking spray or wear a food-safe glove and use your hands to press and smooth the top.
Press the mixture into the corners so everything is level. You want a flat, even layer so it is easy to cut.
Freezing, Cutting, and Dipping
Now the candy center needs to firm up.
Place the pan in the freezer for about 30 minutes.
Do not forget it for too long. If you leave it much longer, it gets rock hard and tougher to cut.
When it is firm but not frozen solid, lift it out with the parchment and place it on a cutting board. Cut into squares or rectangles, whatever size you like for bite-size candy.
Next, line a baking sheet with fresh parchment and arrange the squares on it. Put the tray back in the freezer while you melt the chocolate wafers.
To dip:
Put the melting wafers in a microwave safe bowl or large measuring cup.
Microwave in 30 second intervals, stirring each time, until smooth.
Drop a chilled candy square into the melted chocolate, turn it to coat, then lift it out with a fork.
Let extra chocolate drip off, then place it back on the parchment.
When all pieces are dipped, place the tray in the freezer again for about 30 minutes so the coating can set. Store the finished candy in the freezer until serving.
Taste and Variations
The inside has that fluffy, whipped texture just like a Three Musketeers bar, and the outside chocolate tastes richer and smoother. In the video, this recipe was called the number one favorite.
Ideas from the kitchen chatter:
Add coconut to turn it into something like Idaho spud style candy.
Play with different flavors of chocolate coating, such as dark or white.
2. Two Ingredient Fudge
(With 14 Easy Flavor Ideas)
Two ingredient fudge feels like a magic trick. No thermometer, no stove, no boiling sugar. Just a bag of chips, a can of sweetened condensed milk, and a microwave.
In the Dining on a Dime Cookbook Volume 2, there are 14 variations built from this basic recipe.
Base Ingredients
1 bag (12 oz) baking chips
1 can sweetened condensed milk
The chips must be a full 12 ounces for the fudge to set right. You can use:
Peanut butter chips
White chocolate chips
Mint or peppermint chips
Regular chocolate chips
Cherry chips, if you can find them
Or any baking chip that melts smoothly
Cherry chips are rare in many stores now, but if you do find them, they make a fun holiday fudge.
Simple Microwave Method
Pour the chips into a microwave safe bowl.
Add the sweetened condensed milk.
Microwave for about 30 seconds to 1 minute.
Stir well.
Continue heating in 30 second intervals, stirring between each one, until the mixture is smooth and glossy.
Stirring is important because microwaves heat unevenly. The edges get hot first and can scorch if you let them sit.
Once your fudge base is smooth, you can stir in extras if you like, such as nuts, crushed candy, or flavorings, depending on which variation you are making.
Setting the Fudge
Grease an 8x8 inch pan.
Pour in the fudge and spread it evenly.
Refrigerate until firm.
If your fridge is packed or you live somewhere cold, you can even set the pan outside in winter weather, as mentioned in the video. Just keep critters in mind; jokingly, they said it could become a treat for deer and bears.
Once set, slice into squares and serve.
3. Haystacks (A Family Favorite No Bake Candy)
Haystacks are crunchy, chocolatey mounds filled with coconut. They look rustic on the pan, which makes them perfect for quick Christmas platters. In the video, these were called Mike’s favorite candy.
Ingredients
Candy wafers for melting (any chocolate flavor)
Shredded coconut (sweetened or unsweetened, but sweetened tastes richer)
You can also use regular chocolate chips, but candy wafers tend to set harder. If you prefer a firmer set with chips, stir in about 1 tablespoon of coconut oil or food-safe paraffin wax for canning.
Paraffin may sound odd, but it is food grade and is often used to make candy coatings shiny and firm.
How to Make Haystacks
Melt the candy wafers in a microwave safe bowl, heating in short intervals and stirring each time.
Stir until the chocolate is fully smooth.
Add shredded coconut and stir to coat every piece.
Prepare a baking sheet with parchment paper or a light coating of cooking spray. A silicone baking mat works well too if you have one free.
Use a spoon to drop small mounds of the coconut mixture onto the pan. You can make them bite-sized or go for a few big “monster” haystacks for fun.
Let them cool at room temperature until firm, or place the tray in a cool spot to speed it up.
Cost and Texture
This recipe is very budget friendly, especially if you find the wafers on clearance. In the video, the total cost came out around $2.50 to $3, compared to about $12 for similar store-bought candies.
If you use dehydrated coconut instead of soft bagged coconut, the candy has more crunch. With soft coconut, the bite is chewier. Both versions taste like pure Christmas.


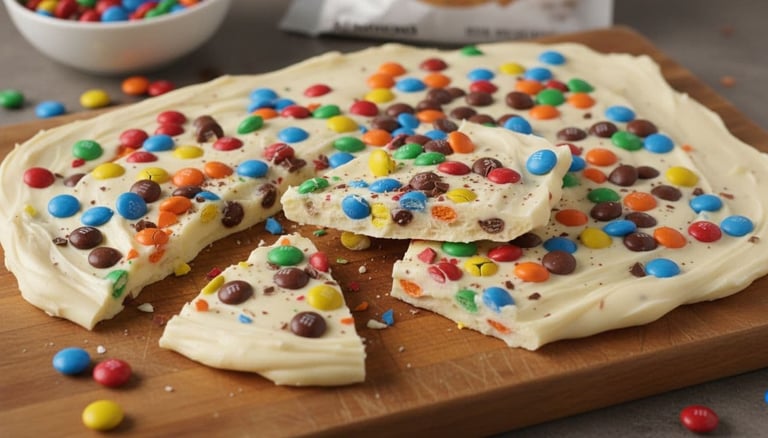
4. Quick M&M Bark (Easy Peppermint Bark Style Candy)
Peppermint bark is a classic, but this version uses M&Ms for kids who like chocolate without mint. The method is almost the same, so you can swap in crushed candy canes if you want the traditional flavor.
Ingredients
Almond bark or candy coating
M&Ms (or crushed candy canes for peppermint bark)
Almond bark often goes on deep clearance after Christmas. In the video, some bags were only about 20 cents when bought about 10 days after the holiday.
Melting and Spreading
Melt the almond bark in the microwave, stirring every 30 seconds until smooth.
Pour about two thirds of the melted bark onto an ungreased baking sheet or parchment.
Spread it into a thin, even layer.
You do not need to grease the pan. Candy coating has enough fat that it usually releases cleanly once it is hardened.
The plan in the video was to tint the remaining third of the bark with red food coloring to swirl over the top. Gel or certain concentrated food colors can make almond bark seize and stiffen, which is what happened there. Liquid food coloring would have worked better.
If your colored portion seizes, you can skip the swirl and pivot:
Press M&Ms on top for M&M bark.
Or sprinkle on crushed peppermint for quick peppermint bark.
Let the bark cool until firm, then break it into pieces.

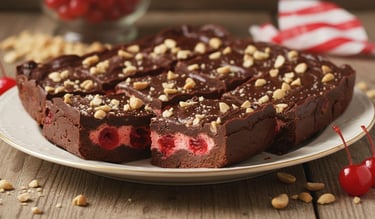
5. Cherry Mash Fudge (Old-Fashioned Candy Shop Flavor)
Cherry Mash is an old-fashioned candy with a cherry center and a chocolate peanut coating. It can be hard to find in stores, so making a pan at home is a treat.
Preparing the Peanuts
You need chopped peanuts for the topping. A simple chopping tool or “peanut smasher” works great.
Add peanuts to the chopper.
Rotate or move it until the nuts are broken into small pieces.
Let kids help with this part; they usually enjoy the action.
Set the crushed peanuts aside for later.
Making the Cherry Layer
Since cherry baking chips are rare now, this version uses white chips with cherry flavoring and red color.
You will need:
About 11 oz white chocolate chips
Sweetened condensed milk, slightly less than a full can
Red food coloring
Cherry extract, about ¼ teaspoon
Steps:
Add the white chips and most of the condensed milk to a microwave safe bowl. Because there were only 11 ounces of chips, they held back a bit of the condensed milk so the mixture would not be too soft.
Melt in the microwave, stirring often, until smooth.
Stir in red food coloring until the mixture is a pretty pink or red.
Add about a quarter teaspoon of cherry extract and taste. You can add a drop more if you like a stronger cherry flavor.
Pour this cherry mixture into an 8x8 silicone pan or a parchment lined baking pan and spread it even. The color looks very festive.
Chocolate Peanut Topping
Next comes the chocolate and peanut layer.
Put about a third of a bag of chocolate chips into the same bowl (no need to wash it).
Microwave and stir until melted.
If the bowl gets too hot, chocolate can seize, turning thick and grainy. That happened in the video, so a bit of coconut oil was stirred in to loosen the mixture and make it smooth again.
Once the chocolate is smooth:
Stir in the crushed peanuts.
Drop the chocolate peanut mixture in chunks over the cherry layer.
Gently spread it so some pink still shows through; it does not need to be perfect.
Sprinkle a few more peanuts over the top and press them lightly so they stick.
Refrigerate the pan until firm, then cut into squares. The taste test verdict was that it “tastes just like Cherry Mash”, which makes this a great choice for anyone who loves that candy.

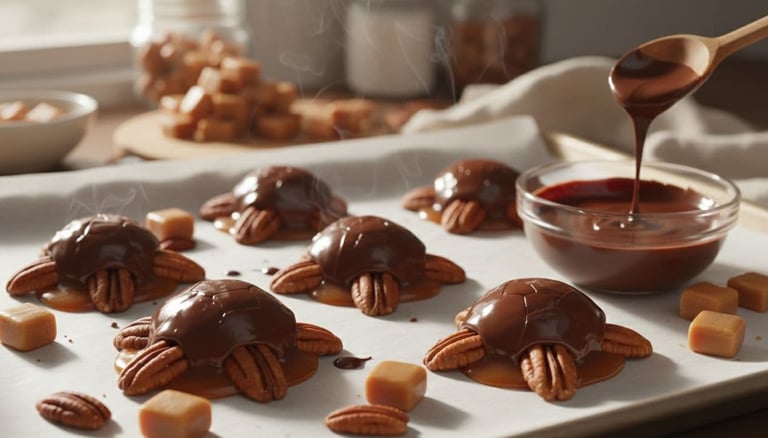
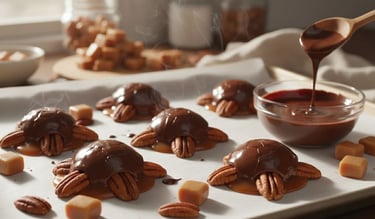
6. Easy Chocolate Turtles
Turtles combine nuts, caramel, and chocolate into one bite. They look fancy but are simple to put together, especially if you melt the caramel in the microwave.
In the video, they joked about meeting at a fudge shop that sold these, where they sometimes used macadamia nuts instead of pecans.
Building the Turtle Base
You can use:
Pecans (traditional)
Almonds
Macadamia nuts
Arrange nuts on a parchment lined baking sheet. A common pattern is:
Three pecan halves in a small cluster for each turtle, or
Five pieces if you want to mimic a head and four legs.
Either way works. The important part is that there is a small pile of nuts ready to hold caramel.
Next, add the caramel.
You can:
Place a few caramel bits on top of each pile and bake briefly until they melt together, or
Melt caramel bits with a little water or cream in the microwave, then spoon a puddle of melted caramel over each nut cluster.
For a true no bake version, melting the caramel in a bowl and spooning it on is the easier path.
Adding the Chocolate
Once the caramel has set slightly and is holding the nuts together:
Melt chocolate chips in the microwave, stirring every 30 seconds.
Spoon melted chocolate over the top of each caramel cluster, or dip the bottoms if you prefer more coverage.
Let the turtles cool until the chocolate is firm. You can speed this up with a few minutes in the fridge.
These are rich, so a little goes a long way. They are also a fun way to bring a bit of fudge shop nostalgia into your own kitchen.
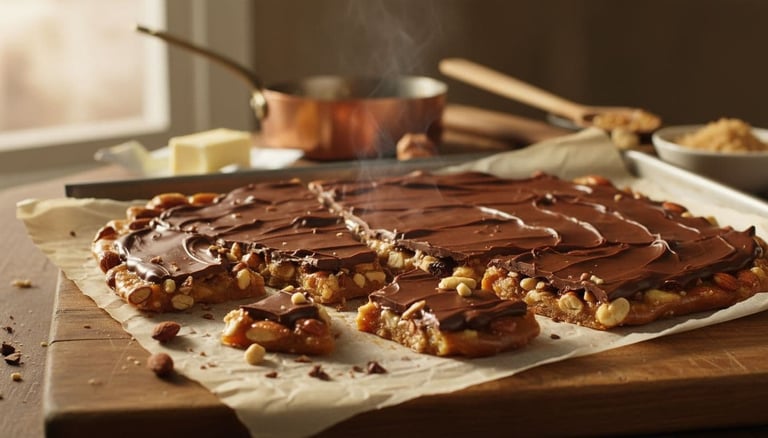
7. Simple English Toffee with Chocolate
This toffee recipe has been made in the family for decades. It uses basic pantry ingredients and a watchful eye on the stove.
Ingredients and Pan Prep
You will need:
½ cup butter (1 stick)
⅓ cup brown sugar
Chopped nuts for the bottom of the pan (almonds, peanuts, or walnuts)
Chocolate chips for the top, mini chips melt fastest
Parchment paper or a greased baking pan
Line a baking dish with parchment paper or grease it well. Sprinkle nuts over the bottom in an even layer.
Parchment can help lift the whole sheet of toffee out at the end. If you reuse an older cookie sheet with a bit of grease on it, that is fine too.
Cooking the Toffee
In a saucepan:
Add the butter and brown sugar.
Heat on medium, stirring until the butter is melted and the mixture starts to bubble.
Once it reaches a steady boil, turn the heat down to low and let it cook for about 7 minutes, stirring and watching carefully.
Watch both the color and the smell. If it starts to get too dark around the edges, or smells like it is about to burn, take it off the heat right away and pour it into the pan. Often you can save it if you catch it early.
On an electric stove that holds heat, turning off the burner during the last minute and letting the residual heat finish the cooking can help prevent burning.
Altitude can affect cooking time. In the video, they mentioned living right on the edge of high altitude, so the toffee needed about 30 extra seconds for a crisp, hard crack texture. If yours turns out a bit chewy, it will still taste great, it just will not be as crunchy.
Adding Chocolate and Finishing
Quickly pour the hot toffee over the nuts and spread it with a spoon so it covers them.
Immediately sprinkle chocolate chips over the top.
Then:
Place a baking sheet upside down over the pan to trap the heat.
Let it sit for about 3 to 4 minutes.
Remove the sheet and spread the melted chocolate into an even layer.
Let the toffee cool completely. Once it is firm, lift it out of the pan and break it into pieces.
Bringing It All Together
These seven No Bake Christmas Candy Recipes prove you do not need fancy tools or long ingredient lists to make impressive holiday treats. A microwave, some chocolate, and a freezer can fill your table with fudge, bark, toffee, turtles, and fluffy candy bars.
Pick one recipe to start with, like the Cool Whip Three Musketeers style candy or the two ingredient fudge, then add more as you get comfortable. Before long, you will have your own Christmas candy “lineup” that friends and family look forward to every year.
Thanks for reading, and happy candy making. Which recipe will you try first?
Southern Spice Homestyle Delights © 2025. All rights reserved.
Address
Rayville, La 71269
Want more from Southern Spice?


Get recipes, cooking inspiration, and exclusive information right to your inbox!
Categories